D-Link DGS-3324SRi Firmware Upgrade
Friday, April 18, 2014These instructions are fairly straightforward. This allows you to update the run configuration to the latest version. My switch already had the latest version of the PROM, so I only upgraded the RUN firmware image.
- Have a copy of the run image
- Connect Serial to the switch (D-Link DGS-3324SRi) and use a terminal software that supports Z-Modem upload
- Turn on the switch
- Before the POST reaches 100% press Shift-3
Power On Self Test …................................... 60 % - That should bring up the BOOT CONFIGURATION MENU:
BOOT CONFIGURATION MENU -------------------------------------------------------------- Management Module MAC Address: 00-11-95-A4-F3-00 Image Option: <Create > Download Protocol: <Z Modem> Baud Rate <115200 > Runtime Image Information: (1) 4.10-B15 (2) 4.40-B04(Boot) Free Flash Space: 1048576 bytes APPLY REBOOT**************************************************** Message Area: Set the Boot Image or create, delete a image. CTRL+T=Root screen Esc=Prev. screen CTRL+R = Refresh
- From my screen above, I already have two images uploaded, and have limited space. If you are in the same situation, you will need to delete one of the images:
- Go to Image Option
- Press
until you get to Delete - Go down to Select Image:
until you select the Runtime Image you would like to delete - Go down to APPLY, and press
- If you are ready to upload, go to Image Option:, press
until you get to Create. In my case Download Protoccol was already Z Modem, and Baud Rate was already 115200 - Now go to APPLY which will start the Z Modem receiver on Switch; Depending on terminal software, that may bring up a Z Modem upload option automatically. Otherwise select it yourself, select the run image and upload.
- A progress meter will start, and after upload, it will process the image and bring you back to that same menu
- Change Image Option: to Set Boot
- Change Select Image: to Image number you uploaded
- APPLY and then REBOOT
- If there is an issue with the new run image you can repeat these instructions to go into the BOOT CONFIGURATION MENU and change the setting back to old image, delete the errant image, etc.
D-Link DGS-3324SRi Password Reset
Friday, April 18, 2014Bought a D-Link DGS-3324SRi Managed Layer 3 Gigabit switch off of ebay.
When I got around to actually using it (a few months later), and learned that username/password was other than default. Contacted the seller but he didn’t know the login info.
Searched a while on the internet, couldn’t find any info, except a hint to how it may be possible (although that info I found, related to a different D-Link switch). Anyway, that got me much farther, and to a solution.
Requirements:
- Serial Connection
- DGS-3324SRi (I haven’t tested this on other DGS-3324* switches, but it probably works on there)
Password (and Settings) reset:
- Connect Serial
- Turn On switch
- After POST, it will start to load runtime Image:
"Please wait, loading Vx.xx-xxx Runtime image ............ xx %"
- Press Shift-3 right when it gets to 100% (I believe it gives you a second or two after reaching 100%). If this doesn’t work, try pressing just before 100%. Immediately or a second after it, it will give you:
Do you want to load the default configuration? (y/n)
- Press ‘y’ to reset
- Let it boot now, and when it asks for username, press
twice (default username and password are blank) - Go ahead and create a new account:
create account admin USERNAME
- Enter the password and repeat for confirmation
- Now type
save
to write your settings to NV-RAM (very important, otherwise on reboot it will be back to your old account)
Yum error when updating
Monday, September 21, 2009This happened to me when trying to run yum update (its happened a few times on several different machines; see fix below):
Traceback (most recent call last):
  File "/usr/bin/yum", line 29, in ?
    yummain.user_main(sys.argv[1:], exit_code=True)
  File "/usr/share/yum-cli/yummain.py", line 229, in user_main
    errcode = main(args)
  File "/usr/share/yum-cli/yummain.py", line 145, in main
    (result, resultmsgs) = base.buildTransaction()
...
  File "/usr/lib/python2.4/site-packages/yum/sqlitesack.py", line 94, in
_read_db_obj
    setattr(self, item, _share_data(db_obj[item]))
TypeError: unsubscriptable object
To fix this:
> yum clean metadata
Or if that doesn’t work, you can also try:
> yum clean all
Preserving Date time stamps on Directories When Copying in XP
Sunday, June 29, 2008I recently upgraded my computer and I had to transfer data from my old harddrives. The problem was, as you can guess from the title, is that XP would not preserve the modified date on directories (although I believe the Create time is preserved).
I was hoping for a program that would integrate into my explorer context menu, etc. I tried some other ones that had their own gui (and the ones that did integrate), and none of them would preserve the modified timestamps.
I tried xcopy but couldn’t figure out how to preserve the modified date.
Anyway, I’m back to using rsync in my cygwin shell:
cd c:newdir
rsync -a -v --progress /cygdrive/e/Data .
or a simple ‘cp’:
cd c:newdir
cp -a /cygdrive/e/Data .
I like rsync since I can run it over and over again and it will only copy changes (although it will still traverse the directory tree to compare files). Especially handy when you get errors that it can’t read certain directory etc. In my case, I had issues with it reading a directory that had url link with foreign characters in the filename.
And this method is probably little too high level for most home users. Cygwin can be problematic and seems complex to install. Also I think you may have to manually select rsync during install.
I’ll keep a look out for other programs, and will update this post if I do find it.
FiOS in Perris
Wednesday, June 25, 2008This past Friday, I saw several Verizon trucks on my street, parked every few hundred feet. Went to talk to them and they informed me that they were installing fiber for FiOS service. The technician said that FiOS should be available in a month or so.
Well I’m fairly excited. I have Time Warner with 10mb down and 1mb up. About a year ago, though, I would have been even more excited. My speeds then were half of what they are now. I believe the speeds (although they probably vary by area) are at 20mb down and 20mb up for the same price I pay now. Whats really useful for me is the upload speed, as it helps with working from home.
Also, I heard that Time Warner is going to start testing usage caps on their internet access. I dont know if they are going to implement that or not. But it definitely helps to have a choice.
Banding on Canon S9000 Printer (Part 2)
Wednesday, October 11, 2006I wrote earlier about banding on my Canon S9000 Printer. Here is an update, 2 years later.
I forgot to note earlier, that I use refillable ink cartridges. I bought them about 2 months after purchasing the printer, and going through about 4 or 5 sets of ink cartridges. So this update mainly concerns people that refill their cartridges.
About 5 months after I wrote that ‘article’, the problem started to happen again. I hadn’t used the printer in about a month and a half and two or three of the ink cartridges were totally empty. Cleaning the head didn’t help. So I tried using new empty refillable cartridges, and that worked great. The output was just like when I had bought the printer new.
The refillable cartridges have a limited lifetime. The cartridges I had problems with, I had refilled them about 15 or 20 times, and lasted over a year. If the ink runs out totally, there is probably a good chance that ink would dry up in the ‘foam’ part of the cartridge, and restrict the flow rate.
So if you’ve tried cleaning the print head, and that doesn’t completely fix it, then its probably that your refillable cartridges are toast. If both don’t work, then you will probably need to buy a new print head.
Trying to delete files that are "in use" under Windows XP
Sunday, July 24, 2005I’ve had this one issue where Windows XP would not let me delete couple of files in different directories. I found a cool little (and free) tool that called Unlocker that lets you unlock those files.
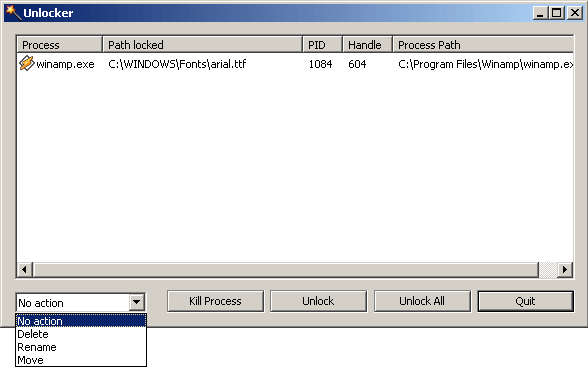
Basically, after you install it, right click the file, a group of files, or a directory, and select “Unlocker”. It will popup a window showing what program has a lock on that file. Really comes in handy.
I also use it to find out what programs have a certain file open. There is also a thing called Process Explorer This program is usefull to find out what files a program has open (as opposed to what program has a certain file open). But that might be easier in the current versions.
But the above won’t help if the reason you can’t delete a file because a file has invalid characters in the filename. in that case, visit this Microsoft KB article might help. I guess it should help in cases where unlocker might not be able.
Adding a FileType to RightClick -> New under XP
Tuesday, March 1, 2005This is about when you right-click in a files area of Windows Explorer or right-click the desktop, and go to New menu. In my case my text file entry got lost (I guess while I was trying to install & uninstall different text editors).
Searched on the net, and found one answer. Didn’t work. Searched some more and found out that the first answer was only half the piece.
- Save a new (or blank) file in SystemRoot\ShellNew (or C:\Windows\ShellNew\). Filename you give it will be used later
- Start regedit (Start->Run->regedit->OK)
- Go to HKEY_CLASSES_ROOT and search for the extension (in my case .txt)
- Create a subkey called ShellNew unless one already exists (RightClick->New->Key)
- Inside ShellNew create a new String value. Name it FileName
- Double-click FileName and enter the name of the file that you saved under the C:\Windows\ShellNew\.
- Click on the extension key again (.txt) and note the ”(Default )” Value. Go to that value under HKEY_CLASSES_ROOT.
- Repeat steps 4 to 6 for this key.
- Not sure exactly, but I think you may be able to enter NullFile for the FileName and it will create a blank file (which will work fine for text file, but wont work for most other types)
I did not reboot for this to take effect. But YMMV.